Work Speed Explained: Every Boost and How to Stack It
How Work Speed works in Palworld and every way to raise it — the four-passive +235% stack, all nine research lines and their totals, the Monitoring Stand and Beta Wave Generator, ten work-speed dishes, the three juices, five partner skills that multiply it, and the player-side accessories and elixirs.

Work Speed is the multiplier behind every job your base Pals do — crafting, mining, lumbering, watering, planting, kindling, cooling, medicine and power generation all run off it. This guide covers what the stat actually measures, why work suitability level matters more than you think, and every single source that raises it: passives, research, structures, food, juices, partner skills, and the player-side gear that speeds up your own hands.
 What Work Speed Actually Does
Here's the part almost nobody gets told: all 288 Pals in the game share the exact same base Work Speed of 100. There is no hidden "fast worker species". A Knocklem and a Lamball start from an identical Work Speed number — what separates them is their work suitability levels, which decide *which* stations they can use and how many work slots they fill, not how fast the underlying stat ticks. So when you want a station to finish faster, you are always doing one of two things: putting a higher-suitability Pal on it, or stacking Work Speed modifiers on top of that flat 100.
Work Speed applies to base labour only. It does nothing for your combat damage, your movement, or how fast a Pal fights — that's what makes it safe to load a dedicated worker with Work Speed passives that gut its Attack or Defense. The twelve suitabilities below are the full set, with how many Pals in the Paldeck carry each one and the highest level any Pal reaches in it.
| Work Suitability | Max Level | Pals With It | Has a Research Line |
|---|---|---|---|
| Transporting | 7 | 140 | No |
| Handiwork | 8 | 109 | Yes |
| Gathering | 8 | 109 | No |
| Lumbering | 8 | 63 | Yes |
| Mining | 8 | 57 | Yes |
| Watering | 8 | 46 | Yes |
| Planting | 8 | 45 | Yes |
| Kindling | 8 | 44 | Yes |
| Medicine Production | 8 | 43 | Yes |
| Cooling | 8 | 38 | Yes |
| Farming | 4 | 29 | No |
| Generating Electricity | 8 | 25 | Yes |
Two things jump out of that table. Transporting is the most common suitability in the game at 140 Pals and it caps at level 7 rather than 8, which is why hauling is never the bottleneck in a well-built base. And Transporting, Gathering and Farming are the three suitabilities with no research line at all — you cannot buy permanent speed for them in the lab, so the only lever left is passives and buffs. Generating Electricity is the rarest at 25 Pals, so if your power keeps browning out it's usually a roster problem, not a speed problem.
Every Passive That Changes Work Speed
Passives are the biggest and the only *permanent, free* multiplier on a Pal. A Pal has four passive slots, and the four best Work Speed rolls add up to +235%, which is more than every structure, research node and meal in the game combined. The list below is every passive on the full passive skills list that touches the stat, including the ones that drag it down.
| Passive | Work Speed | Side Effect |
|---|---|---|
| Demon's Hand | +90% | SAN drains 15% faster; World Tree harvestables don't vanish |
| Remarkable Craftsmanship | +75% | None |
| Artisan | +50% | None |
| Work Slave | +30% | Attack -30% |
| Motivational Leader | +25% | Boosts your Work Speed, not the Pal's |
| Speedy Worker Lv. 4 | +25% | Accessory-only passive |
| Lucky | +20% | Attack +15%, Defense +15% |
| Serious | +20% | None |
| Speedy Worker Lv. 3 | +20% | Accessory-only passive |
| Speedy Worker Lv. 2 | +15% | Accessory-only passive |
| Conceited | +10% | Defense -10% |
| Speedy Worker Lv. 1 | +10% | Accessory-only passive |
| Hooligan | -10% | Attack +15% |
| Clumsy | -10% | None |
| Mentally unstable | -10% | Defense -10% |
| Hermit Sage | -20% | SAN drains 50% slower |
| Slacker | -30% | None |
| Musclehead | -50% | Attack +30% |
The perfect base worker runs Demon's Hand, Remarkable Craftsmanship, Artisan and Serious for +235%. In practice Demon's Hand is the one you fight for — 90% from a single slot is nearly double the next best, and the 15% faster SAN drain is a solved problem once you have hot springs and a good feed box. Watch two traps: Motivational Leader targets the trainer, so a base Pal wearing it is wasting a slot entirely, and Musclehead at -50% is the single worst thing that can land on a worker, even though it's a genuinely good combat roll. Hermit Sage is the interesting outlier — you give up 20% speed for a Pal that basically never needs a break, which is worth it on stations that run unattended. Full acquisition details are in our best passives for base Pals guide.
 Statue of Power: Permanent Work Speed Ranks
The Statue of Power unlocks at level 9 for 2 Technology Points and costs a trivial 20 Stone and 10 Paldium Fragment to build — there is no reason not to have one up before you leave the starting plateau. Feed it Pal Souls and you can push a specific Pal's Work Speed rank up in steps, and because the statue lets you reset the investment and refunds every Soul you spent, there is zero risk in front-loading upgrades onto whatever worker you have right now. Swap to a better Pal later, refund, re-spend.
| Pal Soul | Rarity |
|---|---|
 Small Pal Soul Small Pal Soul | 1 |
 Medium Pal Soul Medium Pal Soul | 2 |
 Large Pal Soul Large Pal Soul | 3 |
 Giant Pal Soul Giant Pal Soul | 4 |
Souls come in four sizes and higher ranks eat the bigger ones, so the early ranks are cheap and the last few are where your Giant Pal Soul stock disappears. Since the statue also handles Attack, Defense and HP ranks, budget deliberately: a base Pal that never fights should be getting 100% of its Souls dumped into Work Speed, while your combat roster leaves Work Speed at zero.
 Monitoring Stand: Set Your Pals to Hard Working
The Monitoring Stand is the cheapest Work Speed source in the entire game and the one new players skip for far too long. It lets you set a base-wide work mode, and pushing that dial to Hard Working or Super Hard Working makes every Pal in the base work faster — at the cost of burning through SAN much quicker. All three tiers do the same job; the upgrades add SAN mitigation on top, which is exactly what you need once you're running the harder work modes permanently.
| Stand | Unlock Level | Tech Points | Materials |
|---|---|---|---|
| Monitoring Stand | 7 | 2 | Wood ×30, Stone ×10 |
| High Quality Monitoring Stand | 28 | 3 | Ingot ×100, Cement ×30 |
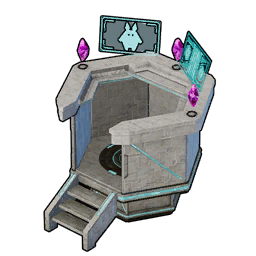 Ancient Monitoring Stand Ancient Monitoring Stand | 71 | 5 | Soralite Ingot ×100, Ancient Civilization Core ×5 |
Thirty Wood and ten Stone at level 7 is nothing, so build the base version the moment it unlocks. The High Quality version at level 28 is the real upgrade for most playthroughs — 100 Ingot and 30 Cement is an afternoon of ore farming, and it lowers the SAN cost of working, which is what actually lets you leave the base on Hard Working full time. The Ancient stand at level 71 is a late-game luxury: 5 Ancient Civilization Core is steep, and by then your SAN management is usually solved by facilities anyway.
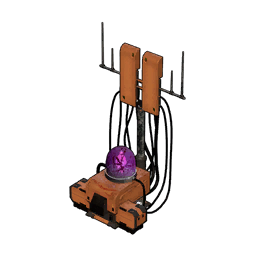 Beta Wave Generator: A Flat Base-Wide Buff
The Beta Wave Generator is a single placeable that raises the Work Speed of every Pal in the base, and its description is explicit that placing more than one has no additional effect — one per base, no exceptions, don't waste the Circuit Boards. It unlocks at level 46 for 3 Technology Points and costs 40 Pal Metal Ingot, 30 Circuit Board and 5 Bio Battery, which makes it a genuine mid-to-late-game project rather than something you slot in casually.
Pair it with the Alpha Wave Generator (level 41, 3 points) which does the opposite job — slowing SAN decay — because the two together are what let a Super Hard Working base run indefinitely. Same one-per-base rule applies. The full build breakdown and the raw material chain behind those Circuit Boards is in our Beta Wave Generator guide.
Pal Labor Research Lab: Permanent Percentages
The Pal Labor Research Lab is the only source of *permanent, base-wide, per-suitability* Work Speed. Each line is a chain of nodes you unlock by assigning Pals with that suitability to research, and the work cost balloons at the top end — the last node in most trees is worth ten million workload on its own. Nine of the twelve suitabilities have a line; Transporting, Gathering and Farming have none.
| Research Line | Nodes | Total Work Speed | Total Workload |
|---|---|---|---|
| Medicine Production | 8 | +65% | 17,950,000 |
| Handiwork | 6 | +45% | 17,250,000 |
| Kindling | 6 | +45% | 17,250,000 |
| Generating Electricity | 6 | +45% | 18,350,000 |
| Watering | 6 | +45% | 5,750,000 |
| Planting | 6 | +45% | 5,750,000 |
| Lumbering | 6 | +45% | 5,750,000 |
| Mining | 6 | +45% | 5,750,000 |
| Cooling | 5 | +40% | 570,000 |
Cooling is the standout deal by a mile: +40% for 570,000 total workload, roughly thirty times cheaper than Handiwork's 17.25 million for a nearly identical payoff. Finish Cooling first, always. After that, Watering, Planting, Lumbering and Mining all cost 5.75 million for +45%, so pick whichever of those four your base actually leans on. Handiwork, Kindling, Electricity and Medicine are the expensive tier at 17–18 million each — they're worth it eventually, but they're the last thing you finish, not the first. Medicine is the only line that breaks the six-node pattern: six task levels for +45% plus two extra Research Tips nodes worth +10% each.
 Food That Buffs Work Speed
Ten cooked dishes carry a temporary Work Speed buff, and the trick is that you don't need to hand-feed them — drop them in the Feed Box and base Pals pick up the buff automatically while they eat. That makes food the laziest permanent-uptime Work Speed source in the game, as long as your farm can keep the box stocked. Nutrition below is how much hunger the dish restores; SAN is the sanity it gives back on eating.
| Dish | Nutrition | SAN | Recipe | Extra Effect |
|---|---|---|---|---|
 Mushroom Stew Mushroom Stew | 212 | 11 | — | Attack +10% |
 Pizza Pizza | 184 | 23 | Flour ×1, Red Berries ×2, Tomato ×2, Milk ×2 | Stay full longer |
 Dumud Chowder Dumud Chowder | 170 | 21 | Raw Dumud ×1, Lettuce ×2, Tomato ×2 | Stay full longer |
 Mozzarina Hamburger Mozzarina Hamburger | 162 | 20 | Mozzarina Meat ×1, Flour ×1, Lettuce ×2 | SAN drains slower |
 Grilled Lamball Grilled Lamball | 147 | 18 | Lamball Mutton ×1, Lettuce ×2 | SAN drains slower |
| Minestrone | 146 | 18 | Tomato ×3, Carrot ×2, Onion ×2, Potato ×1 | None |
 Fried Chikipi Fried Chikipi | 108 | 14 | Chikipi Poultry ×1, Flour ×1, Egg ×1, High Quality Pal Oil ×1 | SAN drains slower |
 Chikipi Sauté Chikipi Sauté | 92 | 12 | Chikipi Poultry ×1, Red Berries ×2 | None |
 Salad Salad | 84 | 11 | Lettuce ×2, Tomato ×2 | None |
 Stir-Fried Vegetables Stir-Fried Vegetables | 54 | 7 | Onion ×2, Carrot ×2 | Defense +10% |
For a working base, Mozzarina Hamburger and Grilled Lamball are the picks — both stack the Work Speed buff with slower SAN decay, which is exactly the pairing you want when the Monitoring Stand is set to Hard Working. Dumud Chowder and Pizza win on raw nutrition if your problem is Pals wandering off to eat every few minutes. At the bottom, Salad and Stir-Fried Vegetables cost only farm crops and nothing else, so they're the ones you can mass-produce from the moment you have a plantation running — a permanently stocked box of Salad beats an empty box of Hamburgers every time. Cooked dishes also spoil, so keep the box topped rather than dumping a thousand at once.
 Juices: The Biggest Buff, at a Price
Three drinks push Work Speed harder than any meal, and all three pay for it in SAN. These are burst tools, not a permanent setup — pop them when you need a specific craft finished now, then let the base recover. Leaving them in a Feed Box permanently will drive your Pals into depression and sickness faster than any facility can heal them.
| Drink | Effect | Recipe | Craft Workload |
|---|---|---|---|
 Suspicious Juice Suspicious Juice | Increases Work Speed, lowers SAN | Beautiful Flower ×3, Horn ×3, Bone ×1, Aquatic Pal Fluids ×1 | 30,000 |
 Strange Juice Strange Juice | Significantly increases Work Speed, significantly lowers SAN | Beautiful Flower ×5, Horn ×5, Bone ×2, Aquatic Pal Fluids ×2 | 300,000 |
| Mysterious Mushroom Juice | Greatly boosts Work Speed, drastically decreases SAN | Mysterious Mushroom ×20, Beautiful Flower ×10, Horn ×10, Bone ×5, Aquatic Pal Fluids ×5 | 1,000,000 |
The escalation is brutal on both axes. Suspicious Juice is cheap enough to make in bulk at 30,000 workload and its SAN hit is manageable. Strange Juice costs ten times the workload for a stronger buff and a proportionally nastier crash. Mysterious Mushroom Juice sits at a million workload and 20 Mysterious Mushroom per batch — it is the strongest Work Speed consumable in the game and also the fastest way to break a Pal, so treat it as a one-off for a big craft rather than a routine. Keep medicine on hand whenever juices are in rotation.
 Partner Skills That Multiply Work Speed
Five Pals carry a partner skill whose scaling is a straight Work Speed percentage, and the numbers here dwarf everything else in this guide — the catch is that they're conditional, tied to that specific Pal, and scale with the skill's rank rather than being on all the time. The five values below are the skill at ranks 1 through 5.
| Pal | Partner Skill | Work Speed by Rank |
|---|---|---|
 Ribbuny Botan Ribbuny Botan | Ground 'n' Pound | 200% / 220% / 260% / 320% / 400% |
| Depresso | Caffeine Inoculation | 100% / 200% / 400% / 600% / 900% |
 Jelliette Jelliette | Jelliette Drop | 50% / 60% / 70% / 90% / 120% |
 Jellroy Jellroy | Jellroy Drop | 50% / 60% / 70% / 90% / 120% |
 Sekhmet Sekhmet | Desert Empress | 20% / 24% / 28% / 32% / 40% |
Depresso is the famous one and the biggest number on the board: at max rank its energy drink is a 900% Work Speed self-buff on top of a doubling of its movement speed, which is absurd for a rarity-1 Pal you can catch in the first hour. It only carries level 1 in Handiwork, Mining, Transporting and Farming, so it's not replacing a specialist — it's a burst button. Ribbuny Botan is the steadiest of the five, starting at 200% at rank 1 where Depresso only starts at 100%. Sekhmet works differently: its skill buffs Anubis specifically while both are at the base, which makes it a dedicated support for the game's most famous Handiwork Pal rather than a worker in its own right — though Sekhmet's own Handiwork 6 is nothing to sneeze at. See the full partner skills list for how each one activates.
 Your Own Work Speed
The player character has a Work Speed stat too, and it governs how fast *you* mine, chop, craft and harvest by hand. Every level-up gives you a status point you can drop into it, and unlike Pal Work Speed there's no suitability gate — it just makes your own hands faster. Whether it's worth points is a real question: early on, when you're manually mining because you don't have the Pals for it yet, a few points pay for themselves. Once your base runs itself, those points are better off in Weight or Stamina. Our stat priority guide has the full ordering.
| Source | What It Gives | Cost |
|---|---|---|
| Pendant of Diligence | Speedy Worker Lv. 3 (+20% Work Speed) | Ingot ×25, Leather ×20, Paldium Fragment ×25, Ancient Civilization Parts ×2 |
 Islander's Tool Belt Islander's Tool Belt | Speedy Worker Lv. 4 (+25% Work Speed) plus carry weight | Refined Ingot ×20, Leather ×40, Paldium Fragment ×35, Ancient Bark ×30 |
 Speed Remedy Speed Remedy | Permanent small Work Speed increase | Speed Lotus (S) ×4, Predator Core ×1 |
 Speed Elixir Speed Elixir | Permanent Work Speed increase | Speed Lotus (L) ×6, Predator Core ×2 |
The Islander's Tool Belt is the better of the two accessories on paper — Speedy Worker Lv. 4 for +25%, and it doubles as a carry-weight accessory so it isn't competing for a slot the way a pure Work Speed pendant does. The Pendant of Diligence is far cheaper to make and comes in +1 and +2 upgraded versions that push the bonus higher still. Both elixirs are a different category entirely: they permanently raise the stat with no slot cost, they're built from Speed Lotus and Predator Core, and they explicitly do nothing when fed to a Pal — these are player-only. Grab them from the accessories list and the merchant pool when you see them.
The Short Answer
Work Speed starts at a flat 100 on every Pal in the game, so every difference you see between two workers comes from modifiers. In rough order of payoff: passives are king (+235% from four good rolls), research is permanent and base-wide (+40% to +65% per suitability), Statue of Power ranks are refundable so spend them freely, the Monitoring Stand is free speed at level 7, food in the Feed Box gives near-permanent uptime for the cost of farm crops, and juices plus Depresso's partner skill are burst buttons for when something needs finishing right now. Build the cheap layers first — they stack multiplicatively with everything you add later.
Related Guides
Hubs: All Palworld guides · Work Suitability Optimizer · Pal Labor Research Lab · Palworld Passive Skills List
Base workers: Best Passives for Base Pals · Best Pals for Handiwork · Best Pals for Cooling · Best Pals for Kindling · Best Pals for Medicine Production
Structures and stats: How to Get the Beta Wave Generator · How to Get the Flame Cauldron · Palworld Base Building Guide · Best Stats to Level Up · List of All Sicknesses and Injuries · Lucky Pals in Palworld